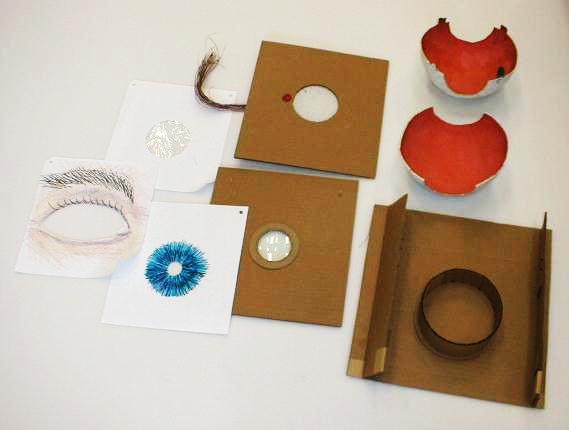
How to make an eyeball model
First, here is a picture with all the parts. They fit together like a
puzzle, and are not glued or taped any further. This way I can store
it without taking up a lot of space. On the bottom right is the
base, made out of corrugated cardboard (my favorite material). Basically a
rectangle with strips folded and glued to the side edges. The ring in the
center holds the eyeball in place.
Near the center of the photo
is a square piece of cardboard which holds the lens. This lens is borrowed
out of the magnifying glass visible in this
photo.Cut out a hole the
size of the lens, and glue a small cardboard ring on one side, and a
half-ring on the other side. The inside diameter of the rings is a tiny bit
smaller
than the lens. This way you can get the lens in and out easily. The third
piece of cardboard has a hole, covered by the thinnest white paper you have
in the house, like tracing paper or tissue paper, but cheap typing paper
works fine too. This
piece represents the retina. I also tied a bundle of phone wire to the back
of this piece, for the optical nerve.
Also shown are 3 sheets of paper, which can be hung in front of the lens.
They have holes punched in the corners, corresponding to two toothpicks
glued in the cardboard of the lens holder. The sheets are the iris
(colored, with a small hole in the middle), the
cornea (big hole, covered with saran wrap, or a blank overhead transparency
sheet), and the eyelids (colored and
cut out). Finally you can see the half-spheres which make
up the eyeball.
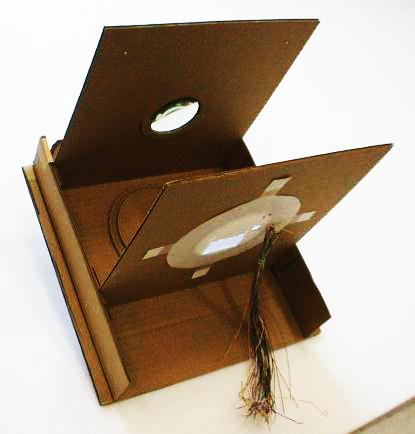
Here are the first pieces put together. Not clearly
visible is that on the inside surface of the side strips of the base are
glued small
pieces of cardboard with 1/8" gaps, into which the other two pieces of
cardboard slide and fit snugly. First fit the piece with the lens. Now you
have to decide how far back you should place the retina. Point the lens
at a distant, bright object, like a tree across the street. As you move
the retina back and forth you'll find a spot where the distant object is
in sharp focus on the white paper of the retina. That is where you want to
mount the back cardboard. In the picture, I have pointed the assembly at
a window, and you can see the image of the window on the retina. Now that
this distance is established, you can make the spere of the eyeball. I used
the balloon-and-newspaper method. Here are a few tips: the colored
balloons from my local party store don't blow up to form nice spheres.
However, their clear balloons, which are more expensive, form
almost perfect spheres. Rip the newspaper into about 3/4" x 1' strips. Make
some glue by boiling flour and water. Now I wet a strip of newspaper,
then lay it on the balloon, then brush it with the glue paste. If you do it
in this order, the paper will not crinkle, and the sphere will turn out
smooth. Lay the strips randomly till you run out of paper. This will take
a while to dry, maybe more than a day. Then I carefully mark the center
line and cut the ball in half. Mark and cut holes for the lens and retina.
A few tabs (see photo)
allow you to fit the two halves back together. I painted the inside
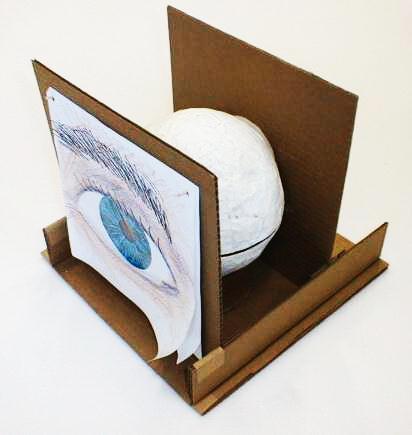
orange and the outside white. Here is the whole thing assembled:
In this photo you can see the toothpicks that hold the iris etc.
One more
thing you can do is to make a water balloon out of another clear
balloon, representing the vitrious humor. This should fit inside the
sphere. In the end, I left the vitreous humor balloon home, since it
would turn everything into a horrible mess if it broke.
You can observe that the image on the retina is fainter with the
iris in place. Less light is transmitted to the retina.
Last update Dec 2004 - HvH
back