When we were doing the eye, most kids had noticed that the image
cast on the retina was upside down. Also they knew that when you use
a magnifying glass close up, the image is right side up, but when you
hold it up and look at something far away, it is upside down again. Time
to do some simple optics.
Looking around the house, I found a small collection of lenses: one was
the lens I had
used in the eyeball, from a big magnifying glass; one was
my wife's reading glasses (about +1.25 diopters), one small magnifying
glass, and another pair of glasses, about -8 diopters. In addition I had
a big fresnel lens (like the kind you can glue to the back window of your
van). I taped a small box to the blackboard (see the picture above), and
for each of these lenses
I had made a cradle (out of 3 layers of cardboard of course), which
I could stick onto the end of the box with a pair of roofing nails such
that half of the lens sticks out.
The same shop light I used before was
set up on the other end.
First I mounted the big lens on
the box, to show what effect we were after.All incoming light gets bent
towards one point, the focal point. When you run your finger
through the light, the shadow on the far side of the lens pivots through
the focal point. The same thing can be shown using a little laser pointer.
To explain how this happens, I replaced the lens
with the prism. You can see the
light being bent down. The lens from the magnifying glass is fat enough
to show that you could imagine it being made up of prism-like shapes.
With these toys to play with, it is easy to show the 3 simple rules of
(positive) lenses:
- A ray of light going through the center of a lens is not bent.
After all, the middle of a lens is almost like a flat piece of glass.
- A ray coming in horizontally, goes out through the focal point on
the other side.
- A ray that comes in through the focal point on one side, goes out
horizontally on the other side. (this is the same as turning the
rays from rule 2) around).
Using the rules, it's easy to show that an object far away makes a small,
upside-down image, like we had seen in the eyeball experiment. Also,
an object close by (closer than the focal length, makes an image that
appears bigger.
Finally, I showed that you can use one lens to make an image of a distant
object, and then use another lens as a magnifying glass to look at that
image: now you have a telescope. Any two lenses can do this trick. I used
my wife's reading glasses and a small lens (plus some cardboard tubes
and tape)
to make a telescope. We looked at leaves and branches of
faraway trees.
Links:
| What is wrong with is picture, OR, what shape is that christmas ornament?
| 
|
Apr 99, Nov 2007
|

When we did the lenses and prisms last time, one of the kids pulled
something out of his pocket that made rainbows. This turned out not
to be a prism but a diffraction grating. Also nowadays, holograms and
reflection gratings are on everything from stickers to pencils. They all
make their colors by interference. Time to talk about waves!
1)
First I showed these soap films.
About a quart of bubble juice (10:1:2 water:diswashing liquid:glycerine)
poured in a cookie sheet, and a coat hanger bent into an oval (so it would fit
into the cookie sheet).
It really pays to get the right background and lighting.
I had a small wire hook taped to the blackboard to hang the
coathanger loop from. Get a black background (like a sheet of of newspaper
tempera-painted black - you have to improvise when you do this late the
night before). For light I used a shop light clamped onto my tripod,
with a big sheet of white paper draped in front. Anyway, the colors are
spectacular, as are the swirls and movements in the soap film.
- Here are some more pictures of soap films.
- Where do these colors come from?
|
 2)
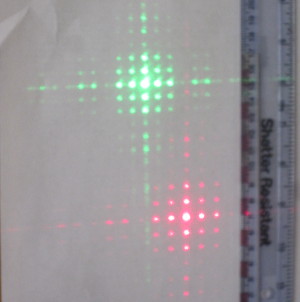
The other thing I showed was a laser pointer pointing at the board. Of
course it makes a single dot. Then
I held a piece of cloth in front, and this pattern appeared (in this picture
I laid 2 laser pointer side-by-side, about 5m from the board).
- What makes such a pattern?
|
 3)
The first thing to get across is that you can add waves up. If
you stand in a quiet surf up to your knees, and the water rising and
falling as the waves roll in, you can drop a stone in the water making
smaller waves on top of the big ones: you can add waves.
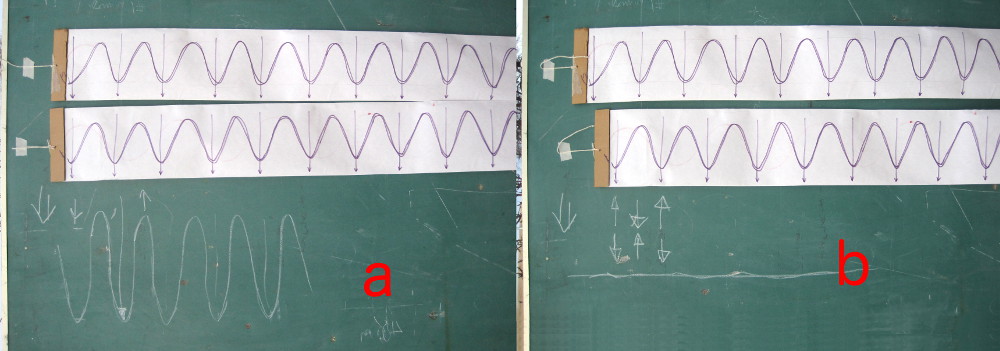
I had drawn waves on big strips of paper (5'x8") that I could tape to the
blackboard.
Using two identical paper strip waves (wavelength 20 cm), I lined them up,
and on the
board drew the result of the addition, a stronger wave with the same
wavelength (a). The do the same thing with
the waves out of phase, and the result is no wave at all
(b).
|
 Imagine the black dots are the threads of the cloth, and waves come from the
left. Then waves going straight through (a)
are in phase - the peaks and troughs line up, and a light apot will
appear on the wall far off to the right.
In the middle image (b), the waves that come
out at this angle are out of phase - peaks line up with troughs.
Therefore at this angle the light waves cancel each other.
Waves at an even larger angle (c) are again
in phase. This pattern of in phase and out of phase repeats
over and over.
The result is a series of light and dark bands on the far wall.
|
 Homework:
- When you are in a room with sheer curtains, look
through them
at some bright point of light. The pattern you see is the same diffraction
pattern I made with the laser pointers - you are looking at multiple images
horizontally and vertically. I took this picture from a hotel room of
the traffic below. Lots of
diffraction patterns. If you look closely, you can see that the white lights
at the top and bottom give rise to miniature rainbows.
Also if you count pixels between
the blue lines and the red ones, you can see that the wavelength of this red
is about 35% larger than that of the blue.
- In the class, I hung a piece of this fabric on the window. You can see these
patterns when you look at the sun reflected on the bumpers of parked cars.
- More homework: next time it rains (so rare here), find a puddle and look for
the colors made by oil on the water.
- Also, in the
Children's Museum, there
is the big bubble table, where you can make big bubbles and look at the
colors.
|
|


